Interface and creation of the first WordPress posts – Lesson 2
Today's lesson we will continue with the study of the most popular content management system WordPress and start learning from the interface and device of the system.
Go to the admin panel (site-name.ru/wp-admin) and first, where we get after logging in is the console (Dashboard). Consider the console interface in the image below.

Under the number [1] Screen Adjustment & Help – if you don’t know something, you can go to help. But there is one problem with the help, most help articles in English, so please read our website. ). Screen customization allows you to disable or enable metaboxes. After clicking on the screen settings button, an additional panel will appear at the top and you can disable and enable various metaboxes in it. To understand the essence of what is happening, I will say, that we have metaboxes marked with a paragraph [2.*]. Of all the metaboxes in the console, I usually use the metaboxes “Right now" and "Fresh comments“, and the rest just turn off.

From the picture above you can see, what metaboxes can be swapped by simple mouse drag. In addition, you can display them in one, two, three and four columns. Since the WordPress admin panel can adapt to different screens, then when you choose 4 columns and narrow the width of the browser window, the number of columns will be adjusted depending on the free space on the screen. Sometimes in the description I see another name for metaboxes, they are also called modules.
Development of new metaboxes is available through plugins or file functions.php website themes, but about this Dashboard Widgets API in general we will talk later.
Among metaboxes, which I don't usually use, but which may be useful to you, there is one called "Other WordPress News” (Other WordPress news). It can be configured like this, how you feel comfortable, by adding a third-party news feed to it, but a useful resource for you, like mine:
https://feeds.feedburner.com/WordPressLessons
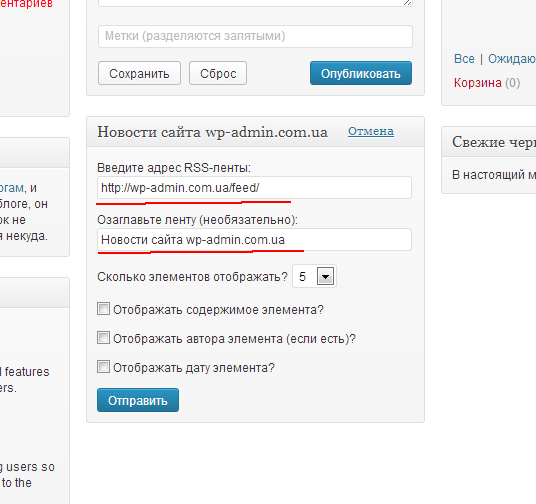
If you paste the link in your metabox and you do everything right, then your console will display news from my site.
Everything on the console, let's move on to the navigation bar (navigation bar).
The navigation bar is required for quick access to the most frequently used actions in the admin panel.

- Comments – if there are unverified comments, shows their number, that the administrator could approve them.
- Add [record, page, media file, user] – Quickly add different types of data.
- Site name [WordPress lessons] - when clicked, it goes to the user part of the site (At the front).
Sometimes you can see more items on the navigation bar, they can appear when connecting new plugins. Plugin in WordPress is an extension of the main functionality of the content management system.
The first thing to understand, before studying the menu, what are the standard content types in WordPress and what are content types in general when developing websites. WordPress was originally designed for blogging., which can also be called an online magazine, like all magazines inside a blog have information pages and pages dedicated to certain headings. Regular pages include the “Contacts” pages., "News", "About Us", “Working Principles” … That is, separate content, which cannot be categorized. materials, which can be divided into separate topics within a blog are called posts. As an example of one of the rubrics, one can consider “Site news“. Additionally, WordPress supports custom data types., but we will talk about them and how to create them in the next lessons.
Let's try to create a material of type “Record”
In the left menu, click on Entries -> Add new
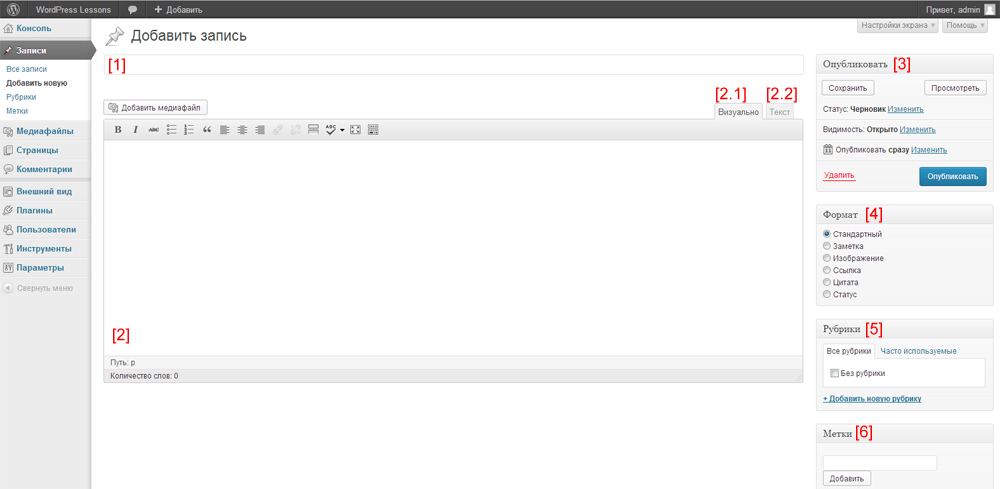
Consider each step
1. header - article title.
2.1. Visually - visual editor for writing articles, no html knowledge.
2.2. Text – tab for entering data in the form of html code.
3. Publish – metabox is used to publish a post or save it as a draft. Metabox has status parameters, visibility and publish.
Status – when pressed, allows you to select options “Draft“, “On approval“.
Visibility - can choose open visibility, which will be open to everyone and every visitor will be able to see the published entry. You can select the visibilityPersonal” and no one will see the record. You can also select "Password protected” and enter a password to protect the article from viewing by all site visitors, Only those with the password can view.
Publish - you can choose the date when the article should be published.
4. Format – formats can be used to output different types of material. The inscription "Standard" when creating or editing a record means, that its format is not specified. Besides, if the specified format is invalid, standard will be used. For now, we will only use the standard format, so you can go to Screen settings and disable this metabox.
5. Rubrics - you can select an existing category or add a new one.
6. Tags – keywords related to the article.
In order not to invent the content of the record, you can use the service Lorem Ipsum, which automatically generates test content for posts.
After posting your first post, go to left menu -> records -> all records.
Let's take a look at the posts page in WordPress

Sorting posts in the admin panel
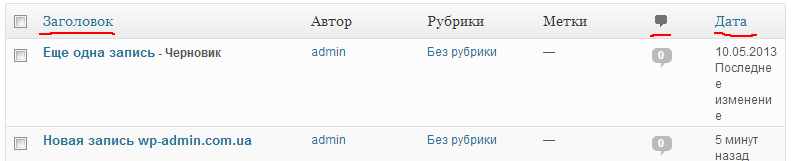
As you can see in the image above, posts in WordPress can be filtered by titles., comments and date.
Let's stop there, we will continue in the next lesson. good luck learning. Register on the site through social networks, you will have the opportunity to view all the lessons on the site through a special menu.

/*

- Basic web design course;
- Site layout;
- General course on CMS WordPress and continuation of the course on template development;
- Website development in PHP.