Development of a personal WordPress account
Today I want to talk about how to solve the problem of creating a personal account in WordPress.. This tutorial is not ideal., but for example, I think it will be enough for you, to understand, how to do it right and what is needed for this.
The first thing we need, is to learn how to output data, which are stored in the admin panel, and it's very easy to do, like everything that is done in the wonderful content management system WordPress.
First you need in the theme folder /wp-content/themes/{theme folder}/ create template file, let's call it page-user-profile.php. For the template to work, it is necessary to create the basic structure correctly. I suggest to create the following structure at the very top of the created file:
<?php
/**
 * Template Name: User Profile
 *
 * Allow users to update their profiles from Frontend.
 *
 */

/* Get user info. */
Below comment /* Get user info. */ add output code:
	<table>
		<tr>
			<td class="avatar">
				<?php echo get_avatar( $current_user->ID, 60 ); ?>
			</td>
			<td class="short_user_info">
				<?php
				echo '<h2>'.$current_user->user_firstname.' '.$current_user->user_lastname."</h2>\n";
				echo '<b>Website:</b> <a href="'.$current_user->user_url.'" target="_blank">'.$current_user->user_url."</a><br />\n";

				echo "<br />";
				?>
			</td>
		</tr>
	</table>
	<?php echo "<br /><b>Биография:</b> \n<blockquote>".$current_user->user_description."</blockquote>\n"; ?>
After adding, save the file. We go to Admin Panel -> Creating a new page – > Choosing a template for data output.

After displaying the template selection and publishing the page, click on the button [View changes]. You will see something like the following on your screen::
 Excellent, now we have the data displayed and I think we should take a closer look at what exactly we did and what functions were used.
get_avatar( $current_user->ID, 60 ) – Displays the current user's avatar in size 60 on 60 pixels. If you, like me, have an avatar just flattened, then this can be easily fixed by simply overriding styles for a given image of the following kind in theme styles, just add .avatar img{ width: auto !important; }.
![]()
Where did I get these stocks and other similar:
$current_user->user_firstname
$current_user->user_lastname
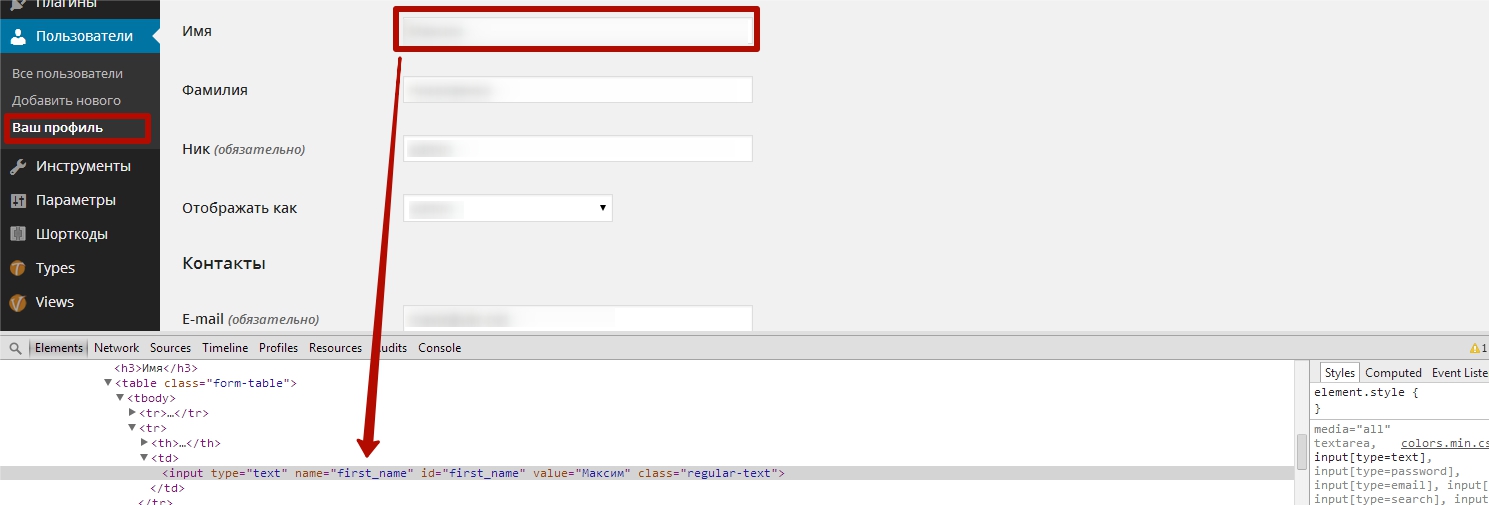
To make it clear, it will be enough to look at such a picture made by me by inspecting the administrator profile in the administrator panel.

In the same way, you can display any field on the profile page. Most often, there is another situation when you need to add fields for the profile. And this moment is solved very simply, by simply adding code to the functions.php file, which is in the theme folder.
function add_social_contactmethod( $contactmethods ) {
    // Add new ones
    $contactmethods['vk'] = 'vk.com';
    $contactmethods['icq'] = 'icq';
    $contactmethods['skype'] = 'skype';
    $contactmethods['twitter'] = 'Twitter';
    $contactmethods['facebook'] = 'Facebook';

    // remove unwanted
  unset($contactmethods['aim']);
  unset($contactmethods['jabber']);
  unset($contactmethods['yim']);
  return $contactmethods;
}
add_filter('user_contactmethods','add_social_contactmethod',10,1);
Excellent at this stage, we have configured the output of profile data, added new fields and removed some old ones.
Editing data on the user side
A little searching on the Internet, i found an interesting code structure, with which you can edit the data of the current user from the frontend. Let's create a new file for the future template and name it page-edit-user-profile.php.
In the file we create a structure already familiar to us, which will help the CMS see our template:
<?php
/**
 * Template Name: Edit User Profile
 *
 * Allow users to update their profiles from Frontend.
 *
 */
Add code below:
/* Get user info. */
global $current_user, $wp_roles;
get_currentuserinfo();

/* Load the registration file. */
require_once( ABSPATH . WPINC . '/registration.php' );
$error = array();
/* If profile was saved, update profile. */
if ( 'POST' == $_SERVER['REQUEST_METHOD'] && !empty( $_POST['action'] ) && $_POST['action'] == 'update-user' ) {

    /* Update user password. */
    if ( !empty($_POST['pass1'] ) && !empty( $_POST['pass2'] ) ) {
        if ( $_POST['pass1'] == $_POST['pass2'] )
            wp_update_user( array( 'ID' => $current_user->ID, 'user_pass' => esc_attr( $_POST['pass1'] ) ) );
        else
            $error[] = __('The passwords you entered do not match.  Your password was not updated.', 'profile');
    }

    /* Update user information. */
    if ( !empty( $_POST['url'] ) )
        update_user_meta( $current_user->ID, 'user_url', esc_url( $_POST['url'] ) );
    if ( !empty( $_POST['email'] ) ){
        if (!is_email(esc_attr( $_POST['email'] )))
            $error[] = __('The Email you entered is not valid.  please try again.', 'profile');
        elseif(email_exists(esc_attr( $_POST['email'] )) != $current_user->id )
            $error[] = __('This email is already used by another user.  try a different one.', 'profile');
        else{
            wp_update_user( array ('ID' => $current_user->ID, 'user_email' => esc_attr( $_POST['email'] )));
        }
    }

    if ( !empty( $_POST['first-name'] ) )
        update_user_meta( $current_user->ID, 'first_name', esc_attr( $_POST['first-name'] ) );
    if ( !empty( $_POST['last-name'] ) )
        update_user_meta($current_user->ID, 'last_name', esc_attr( $_POST['last-name'] ) );
    if ( !empty( $_POST['description'] ) )
        update_user_meta( $current_user->ID, 'description', esc_attr( $_POST['description'] ) );

    /* Redirect so the page will show updated info.*/
  /*I am not Author of this Code- i dont know why but it worked for me after changing below line to if ( count($error) == 0 ){ */
    if ( count($error) == 0 ) {
        //action hook for plugins and extra fields saving
        do_action('edit_user_profile_update', $current_user->ID);
        wp_redirect( get_permalink() );
        exit;
    }
}
?>

<?php if ( have_posts() ) : while ( have_posts() ) : the_post(); ?>
    <div id="post-<?php the_ID(); ?>">
        <div class="entry-content entry">
            <?php the_content(); ?>
            <?php if ( !is_user_logged_in() ) : ?>
                    <p class="warning">
                        <?php _e('You must be logged in to edit your profile.', 'profile'); ?>
                    </p><!-- .warning -->
            <?php else : ?>
                <?php if ( count($error) > 0 ) echo '<p class="error">' . implode("<br />", $error) . '</p>'; ?>
                <form method="post" id="adduser" action="<?php the_permalink(); ?>">
                    <p class="form-username">
                        <label for="first-name"><?php _e('First Name', 'profile'); ?></label>
                        <input class="text-input" name="first-name" type="text" id="first-name" value="<?php the_author_meta( 'first_name', $current_user->ID ); ?>" />
                    </p><!-- .form-username -->
                    <p class="form-username">
                        <label for="last-name"><?php _e('Last Name', 'profile'); ?></label>
                        <input class="text-input" name="last-name" type="text" id="last-name" value="<?php the_author_meta( 'last_name', $current_user->ID ); ?>" />
                    </p><!-- .form-username -->
                    <p class="form-email">
                        <label for="email"><?php _e('E-mail *', 'profile'); ?></label>
                        <input class="text-input" name="email" type="text" id="email" value="<?php the_author_meta( 'user_email', $current_user->ID ); ?>" />
                    </p><!-- .form-email -->
                    <p class="form-url">
                        <label for="url"><?php _e('Website', 'profile'); ?></label>
                        <input class="text-input" name="url" type="text" id="url" value="<?php the_author_meta( 'user_url', $current_user->ID ); ?>" />
                    </p><!-- .form-url -->
                    <p class="form-password">
                        <label for="pass1"><?php _e('Password *', 'profile'); ?> </label>
                        <input class="text-input" name="pass1" type="password" id="pass1" />
                    </p><!-- .form-password -->
                    <p class="form-password">
                        <label for="pass2"><?php _e('Repeat Password *', 'profile'); ?></label>
                        <input class="text-input" name="pass2" type="password" id="pass2" />
                    </p><!-- .form-password -->
                    <p class="form-textarea">
                        <label for="description"><?php _e('Biographical Information', 'profile') ?></label>
                        <textarea name="description" id="description" rows="3" cols="50"><?php the_author_meta( 'description', $current_user->ID ); ?></textarea>
                    </p><!-- .form-textarea -->

                    <?php
                        //action hook for plugin and extra fields
                        do_action('edit_user_profile',$current_user);
                    ?>
                    <p class="form-submit">
                        <?php echo $referer; ?>
                        <input name="updateuser" type="submit" id="updateuser" class="submit button" value="<?php _e('Update', 'profile'); ?>" />
                        <?php wp_nonce_field( 'update-user' ) ?>
                        <input name="action" type="hidden" id="action" value="update-user" />
                    </p><!-- .form-submit -->
                </form><!-- #adduser -->
            <?php endif; ?>
        </div><!-- .entry-content -->
    </div><!-- .hentry .post -->
    <?php endwhile; ?>
<?php else: ?>
    <p class="no-data">
        <?php _e('Sorry, no page matched your criteria.', 'profile'); ?>
    </p><!-- .no-data -->
<?php endif; ?>
After pasting the code, as before, create a new page and assign a template to it Edit User Profile. Save the created page and click the button [View changes]:
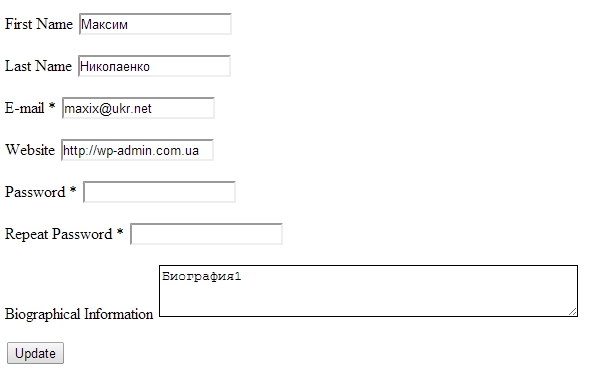
If everything is done correctly, you will see this form of editing, she should work. Displaying other fields from the admin panel is implemented in a similar way. Go to the panel and take the name of the field, which needs to be taken out.
By analogy with the presented code, we display the author's metadata:
<?php the_author_meta( ‘first_name’, $current_user->ID ); ?>
One task left, this is the ability to edit the avatar for the author, but unfortunately WordPress is blocking attempts to edit the avatar from the user side, I'll be happy to hear your suggestions and ideas on how to work with the avatar, I would like to do everything right and work with the WordPress API.
Continuation of improvements to the article, wait, maybe even write a plugin on the theme to make it easier to work in new projects.


- Basic web design course;
- Site layout;
- General course on CMS WordPress and continuation of the course on template development;
- Website development in PHP.