Создание пользовательских стилей в выпадающем меню TinyMCE
Если вы создаете тему WordPress для сайта, который будут наполнять люди незнающие HTML, вы можете для удобства работы для них добавить пользовательские стили в визуальном редакторе TinyMCE.
В папке плагинов, без всяких поддиректорий создайте файл с названием custom-style.php и положите в этот файл, следующий код:
/*
Plugin Name: Custom Styles
Plugin URI: https://www.speckygeek.com
Description: Add custom styles in your posts and pages content using TinyMCE WYSIWYG editor. The plugin adds a Styles dropdown menu in the visual post editor.
Based on TinyMCE Kit plug-in for WordPress
https://plugins.svn.wordpress.org/tinymce-advanced/branches/tinymce-kit/tinymce-kit.php
*/
/**
 * Apply styles to the visual editor
 */
add_filter('mce_css', 'tuts_mcekit_editor_style');
function tuts_mcekit_editor_style($url) {
    if ( !empty($url) )
        $url .= ',';
    // Retrieves the plugin directory URL
    // Change the path here if using different directories
    $url .= trailingslashit( plugin_dir_url(__FILE__) ) . '/editor-styles.css';
    return $url;
}
/**
 * Add "Styles" drop-down
 */
add_filter( 'mce_buttons_2', 'tuts_mce_editor_buttons' );
function tuts_mce_editor_buttons( $buttons ) {
    array_unshift( $buttons, 'styleselect' );
    return $buttons;
}
/**
 * Add styles/classes to the "Styles" drop-down
 */
add_filter( 'tiny_mce_before_init', 'tuts_mce_before_init' );
function tuts_mce_before_init( $settings ) {
    $style_formats = array(
        array(
            'title' => 'Download Link',
            'selector' => 'a',
            'classes' => 'download'
            ),
        array(
            'title' => 'Testimonial',
            'selector' => 'p',
            'classes' => 'testimonial',
        ),
        array(
            'title' => 'Warning Box',
            'block' => 'div',
            'classes' => 'warning box',
            'wrapper' => true
        ),
        array(
            'title' => 'Red Uppercase Text',
            'inline' => 'span',
            'styles' => array(
                'color' => '#ff0000',
                'fontWeight' => 'bold',
                'textTransform' => 'uppercase'
            )
        )
    );
    $settings['style_formats'] = json_encode( $style_formats );
    return $settings;
}
/* Learn TinyMCE style format options at https://www.tinymce.com/wiki.php/Configuration:formats */
/*
 * Add custom stylesheet to the website front-end with hook 'wp_enqueue_scripts'
 */
add_action('wp_enqueue_scripts', 'tuts_mcekit_editor_enqueue');
/*
 * Enqueue stylesheet, if it exists.
 */
function tuts_mcekit_editor_enqueue() {
  $StyleUrl = plugin_dir_url(__FILE__).'editor-styles.css'; // Customstyle.css is relative to the current file
  wp_enqueue_style( 'myCustomStyles', $StyleUrl );
}
После добавления кода активируйте плагин в вашей админке WordPress — в разделе плагины. Из редактора TinyMCE, можно будет менять стили в выпадающем меню Style.
ВАЖНО! Часто использую плагин TinyMCE Advanced, он помогает добавить новые кнопки в редактор, убрать лишние кнопки и произвести простейшие настройки редактора TinyMCE. При помощи этого плагина можно включать выпадающий список стилей, который позволит выбрать подключенный нами ранее стили.
Внешне плагин TinyMCE Advanced выглядит вот так:
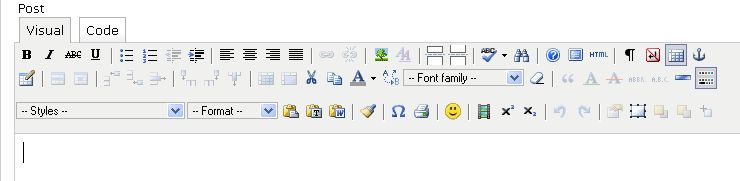
Так выглядит настройка плагина TinyMCE Advanced:

Подробнее можно почитать на английском: wp.tutsplus.com


- Базовый курс по веб-дизайну;
- Верстка сайтов;
- Общий курс по CMS WordPress и продолжение курса по разработке шаблонов;
- Разработка сайтов на PHP.