Console Widget Development. Widget API WordPress
If you have basic programming knowledge, then it will not be difficult for you to learn how to create your own WordPress widgets. This article will be useful to you if you are preparing to create your own WordPress plugins.. I won't pull, just start making your widgets.
Building a simple plugin
Let's create a simple plugin first., for this we need to create in the plugins folder /wp-content/plugins/ file test-plugin.php. In the created file, create the code:
<?php
/**
 * @package Create_widget
 * @version 1.6
 */
/*
Plugin Name: Create widget
Plugin URI: https://wp-admin.com.ua/widget-api-wordpress/
Description: Plugin that adds a widget.
Author: Максим
Version: 1.6
Author URI: https://wp-admin.com.ua/
*/

?>
I will not describe the plugin lines now., think, for this it is worth devoting a separate article, but this simple code will allow us to display our plugin in the admin panel, you can activate it immediately.
This is how the plugin will look in the WordPress admin panel in the plugins section.

After activating the plugin, we can continue to add it. The main tool for adding a widget is the function wp_add_dashboard_widget () which adds a widget to the WordPress dashboard. Consider the function input:
- $widget_id (integer) – required parameter, identifier, will be used as the CSS class and key in the widgets array of the WordPress Dashboard.
- $widget_name (line) – required parameter, widget name, which will be displayed in the header of the widget.
- $callback (line) – required parameter, function name, which will display the contents of the Console widget.
- $control_callback (line) – optional parameter, callback, function name, which will handle the form of the new Console widget. For the time being, we will not work with this function..
Example and order of entering parameters for the wp_add_dashboard_widget function
<?php wp_add_dashboard_widget($widget_id, $widget_name, $callback, $control_callback ); ?>
Widget add function code
<?php
// Function to display the contents of the new Console widget:
function dashboard_widget_function() {
  echo "Hello World, this id my first Dashboard Widget!";
}

// Function, used in the action of the hook:
function add_dashboard_widgets() {
  wp_add_dashboard_widget('dashboard_widget', 'Example Dashboard Widget', 'dashboard_widget_function');
}

// Register a new Console widget using the 'wp_dashboard_setup' action:
add_action('wp_dashboard_setup', 'add_dashboard_widgets' );
?>
Running Widgets in the Console implements an action wp_dashboard_setup which calls the function add_dashboard_widgets. In our example, the function add_dashboard_widgets responsible for displaying information in the widget block.
As a result of using this code in our plugin, the widget will be shown in the CMS console.
Widget output example

This example can be used to output all sorts of important information to the console (online store sales statistics, contacts of the studio that developed the site and maintains it, articles that were published by users with a certain role or even by a separate user). Information can be displayed in various.
You probably noticed, that some widgets have additional settings, for example, the fresh comments widget can be configured and specify how many of them will be displayed in the console.
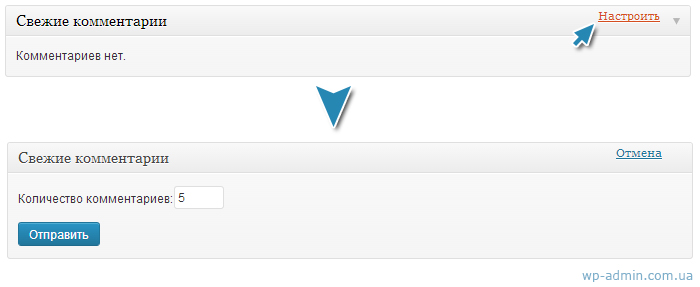
Let us consider in more detail the methods for implementing this functionality.. Firstly, for those who do not know in WordPress, intermediate options and parameters are saved using a special options mechanism. You can practice working with options in one of my articles called “Storing data in wordpress“.
If you are familiar with the options mechanism or you have read my articles and understood everything, then try to replace the old code of our plugin with this one:
<?php
/**
 * @package Create_widget
 * @version 1.6
 */
/*
Plugin Name: Create widget
Plugin URI: https://wp-admin.com.ua/widget-api-wordpress/
Description: Plugin that adds a widget.
Author: Максим
Version: 1.6
Author URI: https://wp-admin.com.ua/
*/

//Показать widget
function custom_dashboard_widget_coach() {
    //get saved data
    if ( !$widget_options = get_option( 'my_dashboard_widget_options' ) )
        $widget_options = array();
    $saved_team = isset($widget_options['team'])? $widget_options['team'] : '';
        echo "
        <p><strong>Choose one of the options</strong></p>
        <div class='team_class_wrap'>
            <label>Selected option: {$saved_team}</label>
        </div>
        ";
}

//Настройка и обновление widget
function custom_dashboard_widget_coach_handle(){
    // получить сохраненные данные
    if ( !$widget_options = get_option( 'my_dashboard_widget_options' ) )
        $widget_options = array();

    // обновление данных
    if ( 'POST' == $_SERVER['REQUEST_METHOD'] && isset($_POST['my_dashboard_widget_options']) ) {

				// basic validation
				// Clean the line, leaving only the specified HTML tags in it, their attributes and attribute values.
            $widget_options['team'] = wp_kses($_POST['my_dashboard_widget_options']['team'],array() );
        //Сохраняем изменения в опциях
                update_option( 'my_dashboard_widget_options', $widget_options );
        }

    // задаем значение по умолчанию
    if(!isset($widget_options['team']))
        $widget_options['team'] = ''; // тут вы можите задать значение по умолчанию
        echo "
        <p><strong>Choose one of the options</strong></p>
        <div class='team_class_wrap'>
            <label>Select:</label>
            <select name='my_dashboard_widget_options[team]' id='team'>
                <option value='1' ".selected( $widget_options['team'], '1', false ).">1</option>
                <option value='2' ".selected( $widget_options['team'], '2', false ).">2</option>
                <option value='3' ".selected( $widget_options['team'], '3', false ).">3</option>
                <option value='4' ".selected( $widget_options['team'], '4', false ).">4</option>
            </select>
        </div>
        ";
}

// регистрация виджета
function add_custom_dashboard_widget_coach() {
        wp_add_dashboard_widget('custom_dashboard_widget_coach', 'Example of a widget with options', 'custom_dashboard_widget_coach', 'custom_dashboard_widget_coach_handle');
}
add_action('wp_dashboard_setup', 'add_custom_dashboard_widget_coach');
?>
I have commented on the given code example., to make it clearer what is happening in the code. Think, if you have carefully reviewed the material presented above, then there should be no questions about this code. If there are still questions, that you can ask questions in the comments at the end of the article.
Removing unnecessary widgets from the console
There are two approaches. The first approach is to clear the global array that contains the list of widgets like this:
function remove_dashboard_widgets() {
global $wp_meta_boxes;
unset($wp_meta_boxes['dashboard']['side']['core']['dashboard_quick_press']);
}
add_action('wp_dashboard_setup', 'remove_dashboard_widgets' );
This example removes the widget Quick Publication.
Other widgets can be removed if necessary, slightly changing the last nested key in the array:
Removes a widget “Plugins”
$wp_meta_boxes[‘dashboard’][‘normal’][‘core’][‘dashboard_plugins’]
Removes “Fresh drafts”
$wp_meta_boxes[‘dashboard’][‘side’][‘core’][‘dashboard_recent_drafts’]
Removes “Fresh comments”
$wp_meta_boxes[‘dashboard’][‘normal’][‘core’][‘dashboard_recent_comments’]
Removes a widget “Incoming links”
$wp_meta_boxes[‘dashboard’][‘normal’][‘core’][‘dashboard_incoming_links’]
Removes a widget “Right now”
$wp_meta_boxes[‘dashboard’][‘normal’][‘core’][‘dashboard_right_now’]
To remove all blocks of standard widgets from the WordPress Dashboard use the following code:
function remove_dashboard_widgets() {
global $wp_meta_boxes;
unset($wp_meta_boxes['dashboard']['side']['core']['dashboard_primary']);
unset($wp_meta_boxes['dashboard']['side']['core']['dashboard_secondary']);
unset($wp_meta_boxes['dashboard']['normal']['core']['dashboard_plugins']);
unset($wp_meta_boxes['dashboard']['normal']['core']['dashboard_recent_comments']);
unset($wp_meta_boxes['dashboard']['normal']['core']['dashboard_incoming_links']);
unset($wp_meta_boxes['dashboard']['side']['core']['dashboard_quick_press']);
unset($wp_meta_boxes['dashboard']['side']['core']['recent_drafts']);
unset($wp_meta_boxes['dashboard']['normal']['core']['dashboard_right_now']);
}
add_action('wp_dashboard_setup', 'remove_dashboard_widgets' );
Also the second approach to remove, this is the use of special functions of the CMS core. Here is an example of the WordPress Codex.
// Создаем функцию для использования в специальном экшене
function example_remove_dashboard_widgets() {
	remove_meta_box( 'dashboard_quick_press', 'dashboard', 'side' );
	remove_meta_box( 'dashboard_incoming_links', 'dashboard', 'normal' );
}

// Экшен для запуска функции 'wp_dashboard_setup'
add_action('wp_dashboard_setup', 'example_remove_dashboard_widgets' );
If you don't need to remove widget blocks, but your widget after installing the plugin got to the end, it can be put at the beginning by default by rearranging the global array with all widgets (global $wp_meta_boxes;). I don’t write about array sorting and rearrangement here, these are php questions.
For more advanced work with widgets, you can always see how they were programmed in the very core of WordPress., in file:
/wp-admin/includes/dashboard.php
Read more about the Widget API
Code to display all options standard widgets.
function get_dashboard_widget_options( $widget_id='' )
{
    //Берем все опции виджетов из базы данных
    $opts = get_option( 'dashboard_widget_options' );

    //If you don't specify a widget ID, то берем все опции
    if ( empty( $widget_id ) )
        return $opts;

    //If you specify a widget ID, then return only the options of this widget, если таковые есть
    if ( isset( $opts[$widget_id] ) )
        return $opts[$widget_id];

    //if none of the conditions fit return false...
    return false;
}
To display one widget option you can use the function:
public static function get_dashboard_widget_option( $widget_id, $option, $default=NULL ) {

    $opts = get_dashboard_widget_options($widget_id);

    //если опции не найдены false
    if ( ! $opts )
        return false;

    //Otherwise, if there is an option and it is not empty, выводим содержимое опции
    if ( isset( $opts[$option] ) && ! empty($opts[$option]) )
        return $opts[$option];
    else
        return ( isset($default) ) ? $default : false;
}
To update widget options WordPress codex offers the following function:
public static function update_dashboard_widget_options( $widget_id , $args=array(), $add_only=false )
{
    //take out all the widget options from the database...
    $opts = get_option( 'dashboard_widget_options' );

    //берем опции только нашего виджета или объявляем пустой массив
    $w_opts = ( isset( $opts[$widget_id] ) ) ? $opts[$widget_id] : array();

    if ( $add_only ) {
        //Flesh out any missing options (existing ones overwrite new ones)
        $opts[$widget_id] = array_merge($args,$w_opts);
    }
    else {
        // Добавляем к существующим опциям новые
        $opts[$widget_id] = array_merge($w_opts,$args);
    }

    //Сохраняем весь массив опций виджета обратно в базу данных
    return update_option('dashboard_widget_options', $opts);
}
For a more complete study of the material, you may need articles:
For today, I think you will have enough material that you can study and test in your plugins. Good luck in developing quality sites.


- Basic web design course;
- Site layout;
- General course on CMS WordPress and continuation of the course on template development;
- Website development in PHP.