Adding multiple menus to the site footer – lesson 19
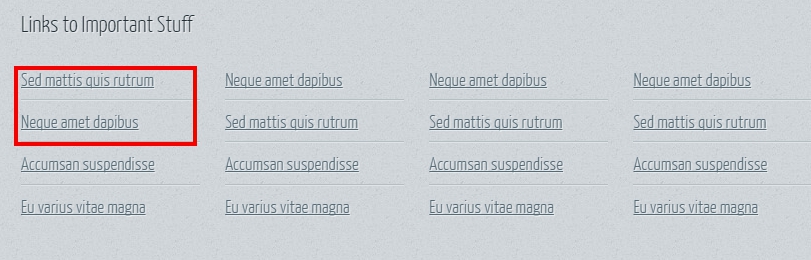
If we look at the bottom of the site, then we will see that there are several blocks with links on the left side of it (Links to Important Stuff), I think it will be right to continue to deal with them.
First, let's create 4 menu in admin panel Appearance -> Menu (Appearance -> Menu).

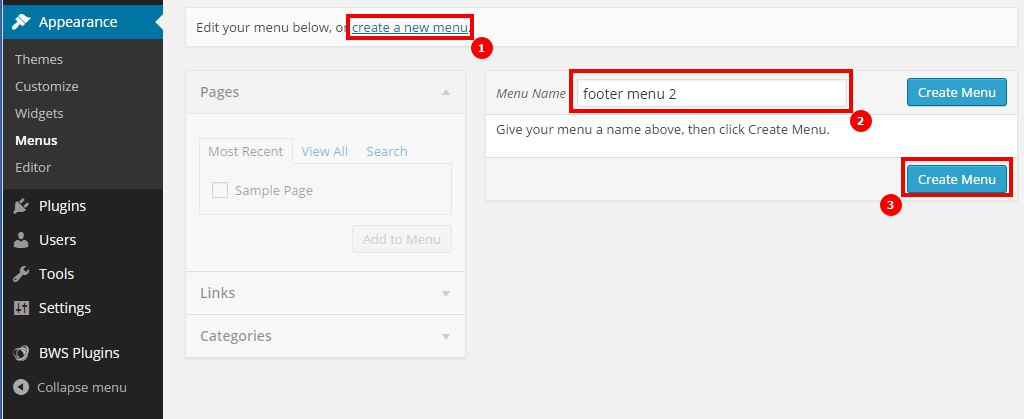
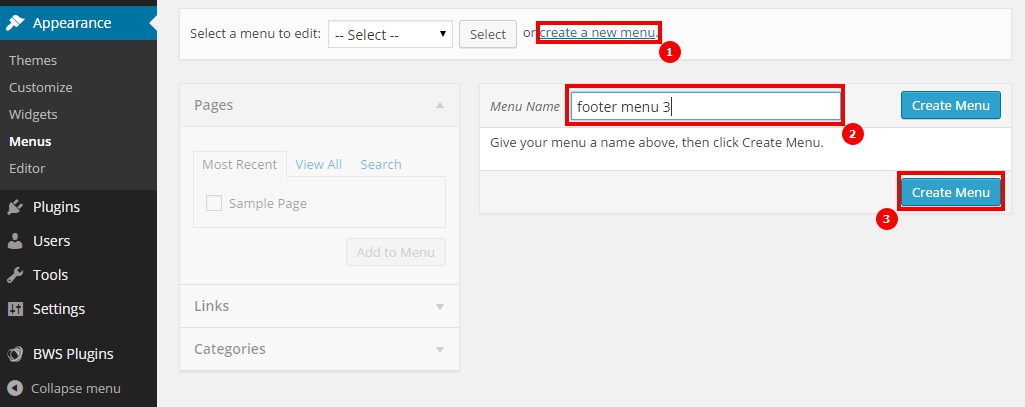
After creating four menus, you need to fill each menu with links, which are currently in the template. Never leave a site empty, always populate it with test data.
Filling the menu, do everything in order:
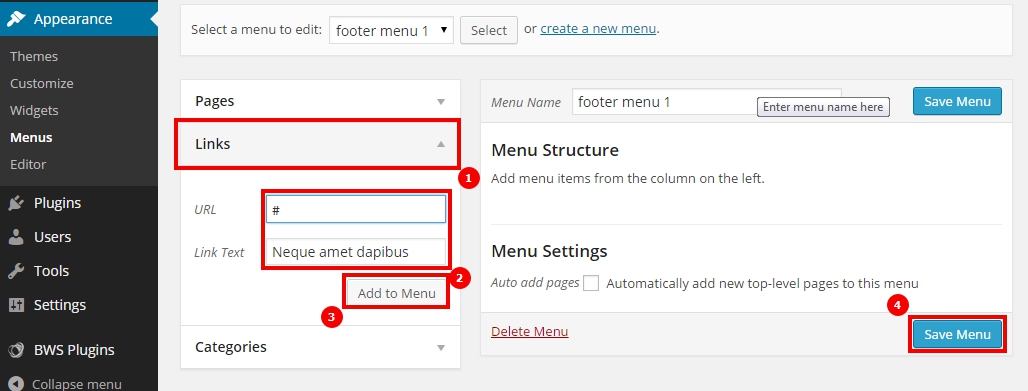
- Choose the type of content link (link);
- In field URL add a lattice, using the grid, you can fill the href attribute of the link, but the link itself will not lead anywhere. In field Link text (Link text) you need to enter link text (anchor);
- After filling in the URL and link text, click on the button Add to menu (Add to Menu);
- When all the necessary items appear in the right part of the workspace, click save menu (Save menu).
Add items yourself and continue.
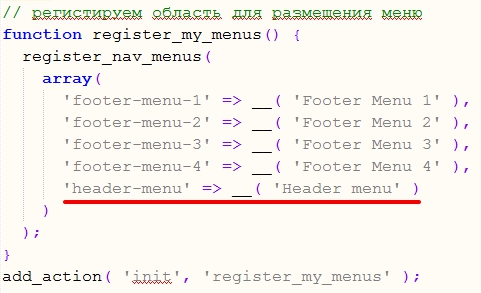
To display the menu, we need to make the menu insertion area, these areas are created in the functions.php file.
1 2 3 4 5 6 7 8 9 10 11 | function register_my_menus() { register_nav_menus( array( 'footer-menu-1' => __( 'Footer Menu 1' ), 'footer-menu-2' => __( 'Footer Menu 2' ), 'footer-menu-3' => __( 'Footer Menu 3' ), 'footer-menu-4' => __( 'Footer Menu 4' ) ) ); } add_action( 'init', 'register_my_menus' ); |
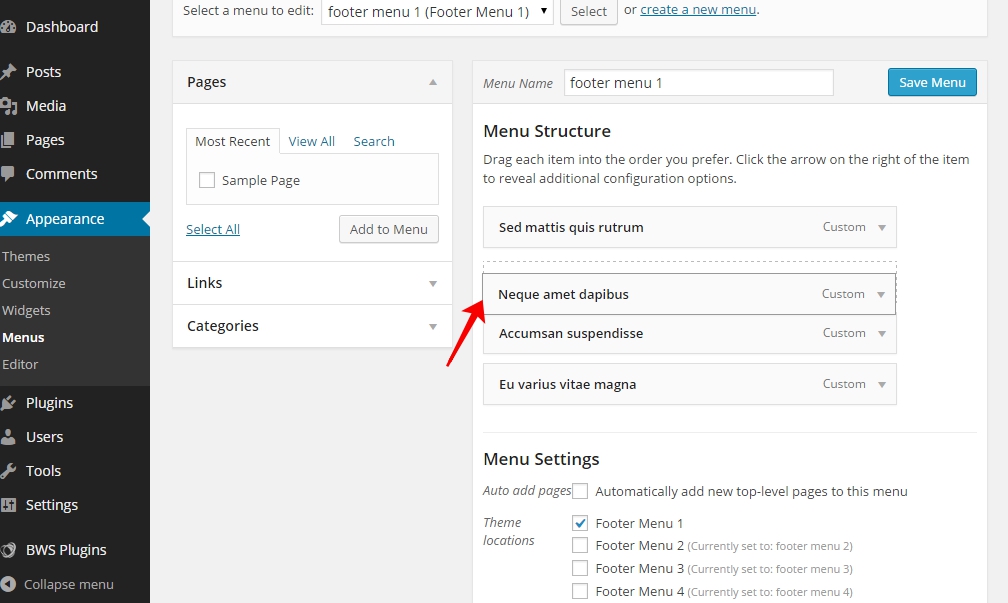
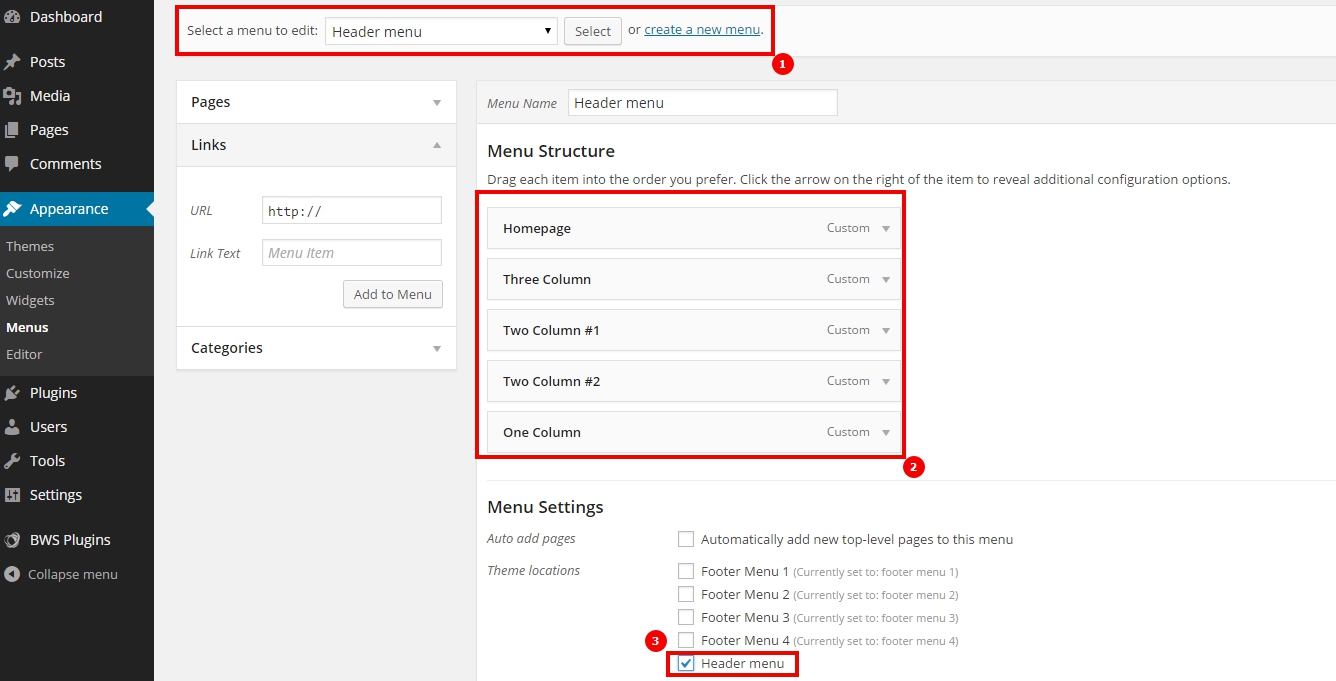
After registering areas for the menu, you need to select the desired menu in the admin panel and specify the desired placement area.


To the selected menu, you must specify the area of placement [1] and save [2].
To display a menu in WordPress, we need a function wp_nav_menu() which we insert into content-bottom.php as shown below.
1 2 3 4 5 6 7 8 9 10 11 12 13 14 15 16 17 18 19 20 | <!-- Links --> <section> <h2>Links to Important Stuff</h2> <div> <div class="row"> <div class="3u"> <?php wp_nav_menu(array( 'theme_location' => 'footer-menu-1', 'menu_class' => 'link-list last-child' )); ?> </div> <div class="3u"> <?php wp_nav_menu(array( 'theme_location' => 'footer-menu-2', 'menu_class' => 'link-list last-child' )); ?> </div> <div class="3u"> <?php wp_nav_menu(array( 'theme_location' => 'footer-menu-3', 'menu_class' => 'link-list last-child' )); ?> </div> <div class="3u"> <?php wp_nav_menu(array( 'theme_location' => 'footer-menu-4', 'menu_class' => 'link-list last-child' )); ?> </div> </div> </div> </section> |
More about the wp_nav_menu function() I advise you to read official website.
If you did everything right, then your template will show the menu, created in admin panel. To check, you can change the order of menu items in the admin panel and see the result on the site.
Minor modifications to the template
In file content-top.php add the name of the site using the function
1 | <?php bloginfo('name'); ?> |
Full header code
1 | <h1><a href="#" id="logo"><?php bloginfo('name'); ?></a></h1> |
We display the menu in the header of the site
In the functions.php file, add an area for displaying the menu, the modified code will look like this.
Create a new menu in the admin panel called “Header menu” and add items from our template to it, determine the location of the menu and remember to save the menu after setting.
In the content-top.php file, we create a function to display the top menu. Since our layout has a non-standard structure (without ul and li tags), then we need to slightly modify the wp_nav_menu function().
1 2 3 4 5 6 7 8 9 10 | <?php $args = array( 'theme_location' => 'header-menu', 'menu_id' => 'nav', 'echo' => false, 'items_wrap' => '<nav id="%1$s" class="%2$s">%3$s</nav>' ); $header_menu = wp_nav_menu($args); echo strip_tags($header_menu, '<a><nav>'); ?> |
Let's analyze the resulting code in order:
- The $args array holds all the attributes of the function.
- theme_location - theme placement area, discussed above;
- ‘menu_id’ => ‘nav’ – adds id = “nav” to the menu wrapper, in our case, the wrapper is a tag <nav id=”nav”></nav>.
- ‘echo’ => false, - default wp_nav_menu function() generates a menu and displays it on the screen, when set to false, the function will not output data and the generated menu can be saved to a variable, in our case the variable $header_menu.
- ‘items_wrap’ => ‘<nav id=”%1$s” class=”%2$s”>%3$s</nav>’ - generates a menu wrapper template.
- In a variable $header_menu the generated menu is saved in which there is still an extra tag <li>, we need to remove it.
- Construction echo strip_tags($header_menu, ‘<a><nav>’) removes all unnecessary tags, other than those in quotes.
After these manipulations, our menu should appear in the form, in which it was originally in the layout and it will not contain any <ul> and <li>.
Although we have analyzed this example, but it would be better to fix the layout of the site, than to do such manipulations.
How to enable the admin bar on the site
For convenience, WordPress has a special admin bar on the user side.. To enable the admin bar, needed in footer.php file, before the closing tag </body> enter function <?php wp_footer(); ?>
1 2 3 4 5 6 7 | <!-- Copyright --> <div id="copyright"> © Untitled. All rights reserved. | Design: HTML5 UP </div> <?php wp_footer(); ?> </body> </html> |
My Theme Source Files
![]()
All for today, In the next tutorial, we will look at how to make navigation in WordPress without additional plugins., because when developing premium themes, you need to use as few plugins as possible.

/*

- Basic web design course;
- Site layout;
- General course on CMS WordPress and continuation of the course on template development;
- Website development in PHP.