TinyMCE editor training - lesson 32
I really like the possibilities of CMS WordPress to work with the visual editor TinyMCE, these features were introduced for those who use the version of WP above 3,9. I do not promise to give you complete information on TinyMCE API, but I will give examples of code that you can use in your work.
Let's start our long and interesting lesson!
Adding a field for choosing a font family and font size
To add elements to work with fonts and their sizes, use the code below.
|
1 2 3 4 5 6 7 8 9 |
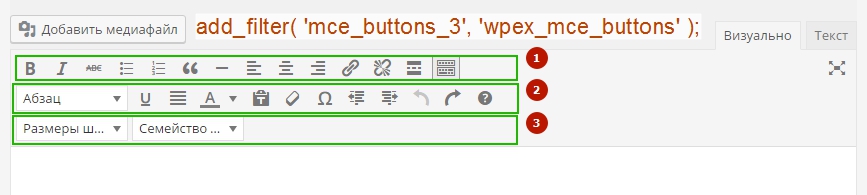
// Enable font size & font family selects in the editor if ( ! function_exists( 'wpex_mce_buttons' ) ) { function wpex_mce_buttons( $buttons ) { array_unshift( $buttons, 'fontselect' ); // Add Font Select array_unshift( $buttons, 'fontsizeselect' ); // Add Font Size Select return $buttons; } } add_filter( 'mce_buttons_2', 'wpex_mce_buttons' ); |
Here's what we got:


We can change mce_buttons_2 to mce_buttons_3 or mce_buttons_1, this will make it possible to move new elements between the first, second and third panel.
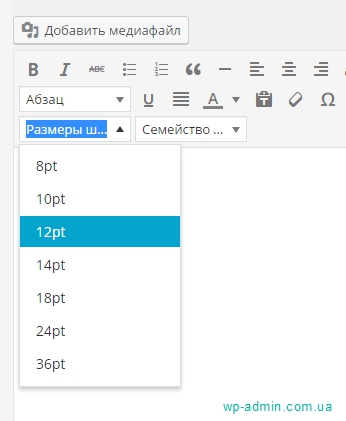
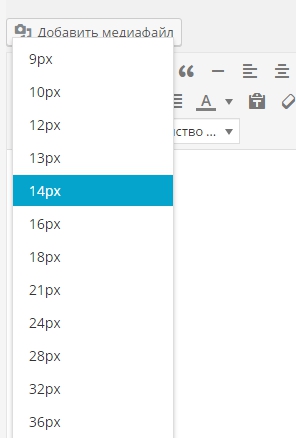
Adding custom font sizes
The default font sizes are not always suitable for the design of the text on the site. Another problem with default fonts, this is what they are configured in points, not pixels, how we got used to it. I prefer to use pixel values (10px, 12px, 13px, 14px..). Below I give an example of a function that will change the default font sizes and units in WordPress..
Adding custom fonts
By default, the engine cannot use custom font names., although they are often needed. If you have created your own template and want to customize the font selection for the user, then you need the following function.
|
1 2 3 4 5 6 7 8 |
// Add custom Fonts to the Fonts list if ( ! function_exists( 'wpex_mce_google_fonts_array' ) ) { function wpex_mce_google_fonts_array( $initArray ) { $initArray['font_formats'] = 'Lato=Lato;Andale Mono=andale mono,times;Arial=arial,helvetica,sans-serif;Arial Black=arial black,avant garde;Book Antiqua=book antiqua,palatino;Comic Sans MS=comic sans ms,sans-serif;Courier New=courier new,courier;Georgia=georgia,palatino;Helvetica=helvetica;Impact=impact,chicago;Symbol=symbol;Tahoma=tahoma,arial,helvetica,sans-serif;Terminal=terminal,monaco;Times New Roman=times new roman,times;Trebuchet MS=trebuchet ms,geneva;Verdana=verdana,geneva;Webdings=webdings;Wingdings=wingdings,zapf dingbats'; return $initArray; } } add_filter( 'tiny_mce_before_init', 'wpex_mce_google_fonts_array' ); |
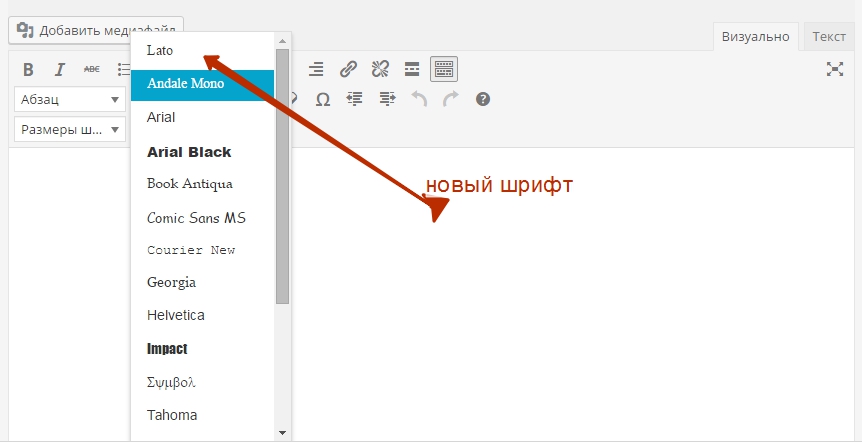
Since some fonts may not be on the user's computer, we need to not only provide a choice of these fonts, but also connect them to WordPress? so that they are displayed correctly in the admin panel. For example, you can include a font Lato which i use above.
|
1 2 3 4 5 6 7 |
if ( ! function_exists( 'wpex_mce_google_fonts_styles' ) ) { function wpex_mce_google_fonts_styles() { $font_url = 'https://fonts.googleapis.com/css?family=Lato:300,400,700'; add_editor_style( str_replace( ',', '%2C', $font_url ) ); } } add_action( 'init', 'wpex_mce_google_fonts_styles' ); |
If you haven't used this feature yet, then I advise you to try it in action, and the result of this function will be the menu shown in the picture below.
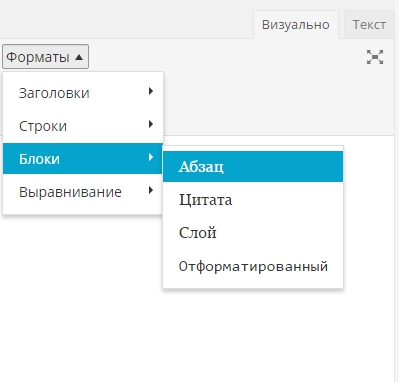

Adding new items to the menu is very simple and the first thing you need to know is the add-on that we will use in the code below $settings[‘style_formats_merge’] = true; this add-on will help you not to create a separate menu, but to supplement the already existing formats menu.
|
1 2 3 4 5 6 7 8 9 10 11 12 13 14 15 16 17 18 19 20 21 22 23 24 25 26 27 28 29 30 31 32 33 34 35 |
// Add new styles to the TinyMCE "formats" menu dropdown if ( ! function_exists( 'wpex_styles_dropdown' ) ) { function wpex_styles_dropdown( $settings ) { // Create array of new styles $new_styles = array( array( 'title' => __( 'Custom Styles', 'wpex' ), 'items' => array( array( 'title' => __('Theme Button','wpex'), 'selector' => 'a', 'classes' => 'theme-button' ), array( 'title' => __('Highlight','wpex'), 'inline' => 'span', 'classes' => 'text-highlight', ), ), ), ); // Merge old & new styles $settings['style_formats_merge'] = true; // Add new styles $settings['style_formats'] = json_encode( $new_styles ); // Return New Settings return $settings; } } add_filter( 'tiny_mce_before_init', 'wpex_styles_dropdown' ); |
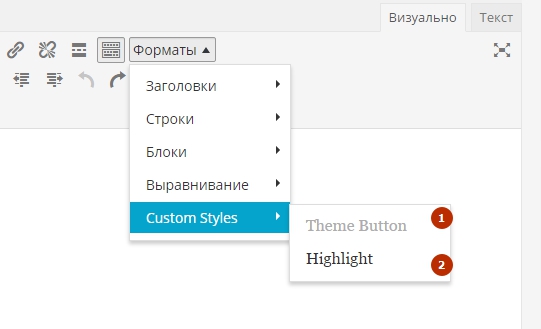
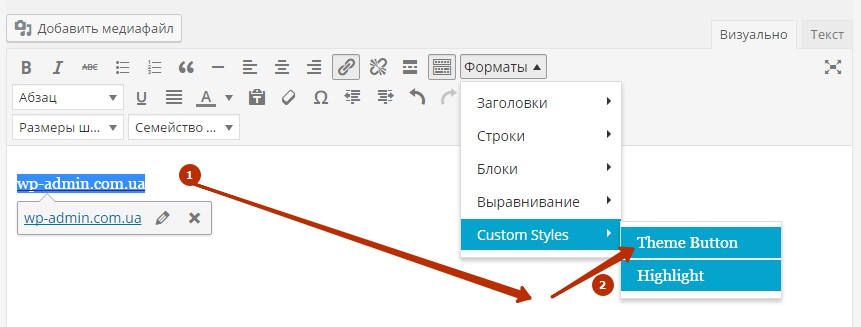
Under the number (2) there is an active item that encloses the selected text in a tag span with class text-highlight.
Under the number (1) inactive item, since this item will only work if the text is enclosed in a tag <a> and highlighted. I showed it in the picture below. Carefully examine the code to understand why this is happening., here I let you figure it out, and we'll move on.
Creating a button in the TinyMCE editor
Creating buttons is especially useful for us, since when creating a theme for wordpress we often create shortcodes, and the user does not need to know all the shortcodes by heart. When creating a button, the user will only need to click on it to add a shortcode or specific text. Creating a button will be divided into two parts.
- Code for declaring a new plugin in functions.php.
- JS script to add button to editor;
The first script will be closely linked to the JS file. So let me introduce you 2 code:
Adding a script to the functions.php file
|
1 2 3 4 5 6 7 8 9 10 11 12 13 14 15 16 17 18 19 20 21 22 23 24 25 |
// Hooks your functions into the correct filters function my_add_mce_button() { // check user permissions if ( !current_user_can( 'edit_posts' ) && !current_user_can( 'edit_pages' ) ) { return; } // check if WYSIWYG is enabled if ( 'true' == get_user_option( 'rich_editing' ) ) { add_filter( 'mce_external_plugins', 'my_add_tinymce_plugin' ); add_filter( 'mce_buttons', 'my_register_mce_button' ); } } add_action('admin_head', 'my_add_mce_button'); // Declare script for new button function my_add_tinymce_plugin( $plugin_array ) { $plugin_array['my_mce_button'] = get_template_directory_uri() .'/js/mce-button.js'; return $plugin_array; } // Register new button in the editor function my_register_mce_button( $buttons ) { array_push( $buttons, 'my_mce_button' ); return $buttons; } |
Add javascript at /wp-content/themes/intrepidity/js/mce-button.js
|
1 2 3 4 5 6 7 8 9 10 11 |
(function() { tinymce.PluginManager.add('my_mce_button', function( editor, url ) { editor.addButton('my_mce_button', { text: 'New Button', icon: false, onclick: function() { editor.insertContent('wp-admin.com.ua - уроки wordpress!'); } }); }); })(); |
Button created and inserts text.
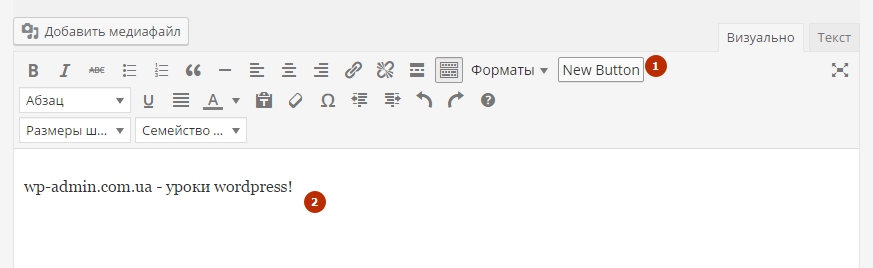
The only disadvantage of such a button is that it takes up a lot of space in the editor., so I suggest making a button with an icon.
You can use the new included styles to customize icons, for admin panel, add them to functions.php file:
|
1 2 3 4 |
function my_shortcodes_mce_css() { wp_enqueue_style('symple_shortcodes-tc', get_bloginfo('template_url').'/css/my-mce-style.css' ); } add_action( 'admin_enqueue_scripts', 'my_shortcodes_mce_css' ); |
If styles need to be loaded from a plugin, you can use the following code:
|
1 2 3 4 |
function my_shortcodes_mce_css() { wp_enqueue_style('symple_shortcodes-tc', plugins_url('/css/my-mce-style.css', __FILE__) ); } add_action( 'admin_enqueue_scripts', 'my_shortcodes_mce_css' ); |
Create an images folder in your theme folder, if it's not there yet. In the created folder, add an icon called check.png.
Next, add the style for the future icon to the css/my-mce-style.css file.
|
1 2 3 |
i.mce-i-my-mce-icon { background-image: url('../images/check.png'); } |
Rework the previously created script in the js/mce-button.js folder, comment out the caption for the text button: ‘New Button’ и icon: false.
Add a new icon parameter: ‘mce-i-my-mce-icon’, which will add to the new button the class created earlier in the admin panel style file.
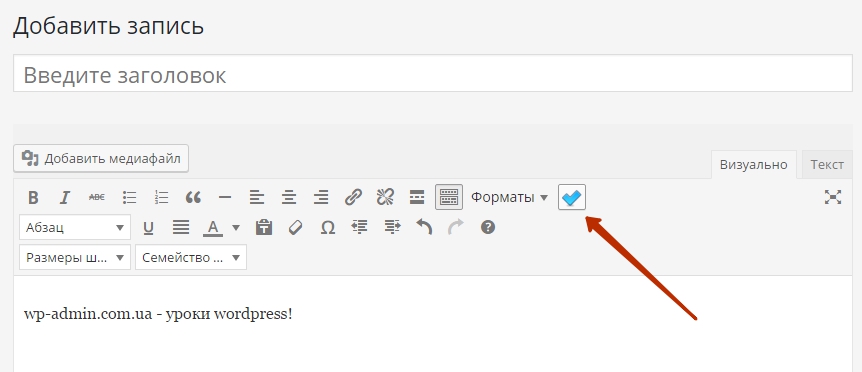
If done right, then you will have a button with an icon, which, when pressed, will add an inscription.
We have created a button with an icon, but if you need to create complex template functionality and a lot of buttons, this method will be difficult. In addition, it is inconvenient to work when there are a lot of buttons on the panel.. Now we will try to understand the question “how to add more free space on the editor panel?”. Change the button code in the js/mce-button.js file to the one you see below.
|
1 2 3 4 5 6 7 8 9 10 11 12 13 14 15 16 17 18 19 20 21 22 23 24 25 26 27 28 29 30 31 32 33 34 35 36 37 38 39 40 41 42 43 44 45 46 |
(function() { tinymce.PluginManager.add('my_mce_button', function( editor, url ) { editor.addButton('my_mce_button', { /*text: 'New Button', icon: false,*/ icon: 'my-mce-icon', type: 'menubutton', menu: [ { text: 'Item 1', menu: [ { text: 'Sub Item 1', onclick: function() { editor.insertContent('wp-admin.com.ua - уроки wordpress!'); } }, { text: 'Sub Item 2', onclick: function() { editor.insertContent('wp-admin.com.ua - уроки wordpress!'); } } ] }, { text: 'Item 2', menu: [ { text: 'Sub Item 1', onclick: function() { editor.insertContent('wp-admin.com.ua - уроки wordpress!!'); } }, { text: 'Sub Item 2', onclick: function() { editor.insertContent('wp-admin.com.ua - уроки wordpress!'); } } ] } ] }); }); })(); |
If you look closely at the structure of the code, then you will understand that there is nothing complicated in it and it will not be difficult to process it. Here is the result we get:
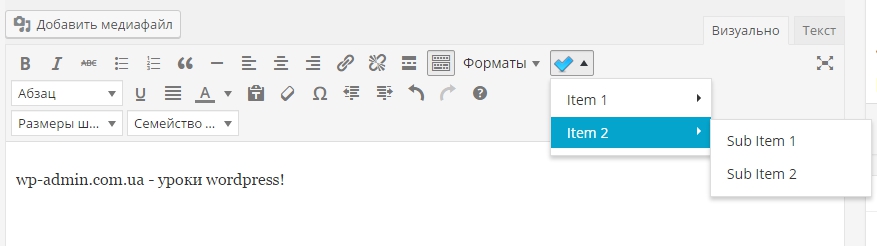
If you've done everything right so far, you will see that when you select one of the menu sub-items, the inscription “wp-admin.com.ua – wordpress lessons” will appear in the text field!”.
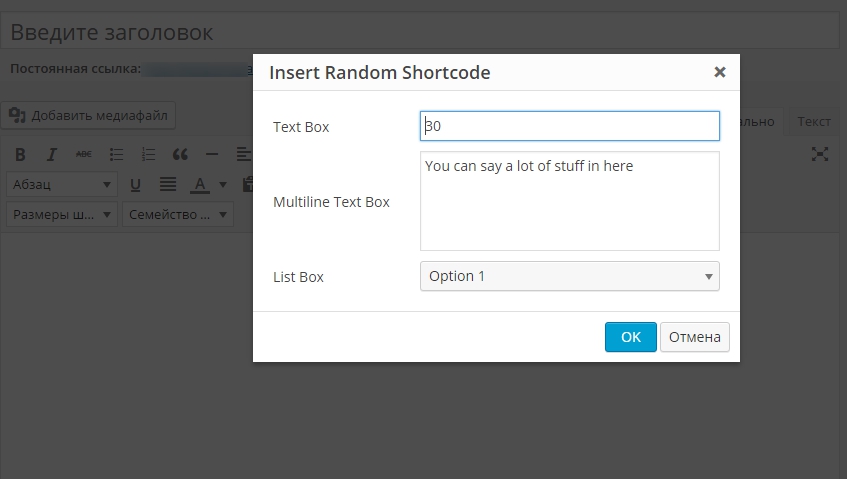
More often than not, pasting text without modification is not very useful., since when inserting a shortcode, additional options must be specified, who will control the work of the shortcode. You can use a pop-up window to specify options in a shortcode, let's figure out together how to create it.
tinymce wordpress popup
To create a popup window, you need to change the code in the js/mce-button.js file to the following. I'm sure if before that you read carefully and everything worked out for you, then you will not have any problems understanding the code below.
|
1 2 3 4 5 6 7 8 9 10 11 12 13 14 15 16 17 18 19 20 21 22 23 24 25 26 27 28 29 30 31 32 33 34 35 36 37 38 39 40 41 42 43 44 45 46 47 48 49 50 51 52 53 54 55 56 57 58 59 60 61 62 63 64 65 66 67 68 69 70 71 72 73 74 75 76 77 78 |
(function() { tinymce.PluginManager.add('my_mce_button', function( editor, url ) { editor.addButton('my_mce_button', { /*text: 'New Button', icon: false,*/ icon: 'my-mce-icon', type: 'menubutton', menu: [ { text: 'Item 1', menu: [ { text: 'Sub Item 1', onclick: function() { editor.insertContent('wp-admin.com.ua - уроки wordpress!'); } }, { text: 'Sub Item 2', onclick: function() { editor.insertContent('wp-admin.com.ua - уроки wordpress!'); } } ] }, { text: 'Item 2', menu: [ { text: 'Sub Item 1', onclick: function() { editor.insertContent('wp-admin.com.ua - уроки wordpress!!'); } }, { text: 'Pop-Up', onclick: function() { editor.windowManager.open( { title: 'Вставить произвольный шорткод', body: [ { type: 'textbox', name: 'textboxName', label: 'Text Box', value: '30' }, { type: 'textbox', name: 'multilineName', label: 'Multiline Text Box', value: 'You can say a lot of stuff in here', multiline: true, minWidth: 300, minHeight: 100 }, { type: 'listbox', name: 'listboxName', label: 'List Box', 'values': [ {text: 'Option 1', value: '1'}, {text: 'Option 2', value: '2'}, {text: 'Option 3', value: '3'} ] } ], onsubmit: function( e ) { editor.insertContent( '[random_shortcode textbox="' + e.data.textboxName + '" multiline="' + e.data.multilineName + '" listbox="' + e.data.listboxName + '"]'); } }); } } ] } ] }); }); })(); |
Here's what happened as a result of the work done with the pop-up window.
Lesson Conclusions
What's next? Then everything is in your hands, you can figure out how you will use the shortcodes and toolbar of the tinymce editor. The lesson turned out to be difficult and a little confusing, but we are not at the first lesson either., time to learn to code, if it doesn’t work out but you want to figure out how to embed the code in your theme, I can take the time and conduct a paid lesson.
Source of ideas and inspiration for the lesson:
WordPress 3.9+ TinyMCE 4 Tweaks: Adding Styles, Buttons, Fonts, Drop-downs & Pop-Ups

/*

- Basic web design course;
- Site layout;
- General course on CMS WordPress and continuation of the course on template development;
- Website development in PHP.