Rozwój osobistego konta WordPress
Dzisiaj chcę porozmawiać o tym, jak rozwiązać problem tworzenia konta osobistego w WordPress.. Ten samouczek nie jest idealny., ale na przykład myślę, że to ci wystarczy, rozumieć, jak to zrobić dobrze i co jest do tego potrzebne.
Pierwsza rzecz, jakiej potrzebujemy, jest nauczenie się wyprowadzania danych, które są przechowywane w panelu administracyjnym, i bardzo łatwo to zrobić, jak wszystko, co odbywa się we wspaniałym systemie zarządzania treścią WordPress.
Najpierw potrzebujesz w folderze motywu /wp-content/themes/{folder tematyczny}/ utwórz plik szablonu, nazwijmy to page-user-profile.php. Aby szablon działał, konieczne jest prawidłowe utworzenie podstawowej struktury. Proponuję utworzyć następującą strukturę na samej górze tworzonego pliku:
|
1 2 3 4 5 6 7 8 9 |
<?php /** * Template Name: User Profile * * Allow users to update their profiles from Frontend. * */ /* Get user info. */ |
Poniżej komentarz /* Uzyskaj informacje o użytkowniku. */ dodaj kod wyjściowy:
|
1 2 3 4 5 6 7 8 9 10 11 12 13 14 15 16 |
<table> <tr> <td class="avatar"> <?php echo get_avatar( $current_user->ID, 60 ); ?> </td> <td class="short_user_info"> <?php echo '<h2>'.$current_user->user_firstname.' '.$current_user->user_lastname."</h2>\n"; echo '<b>Сайт:</b> <a href="'.$current_user->user_url.'" target="_blank">'.$current_user->user_url."</a><br />\n"; echo "<br />"; ?> </td> </tr> </table> <?php echo "<br /><b>Биография:</b> \n<blockquote>".$current_user->user_description."</blockquote>\n"; ?> |
Po dodaniu zapisz plik. Idziemy do Panel administratora -> Tworzenie nowej strony – > Wybór szablonu wyjścia danych.

Po wyświetleniu wyboru szablonu i opublikowaniu strony należy kliknąć na przycisk [Zobacz zmiany]. Na ekranie zobaczysz coś takiego::
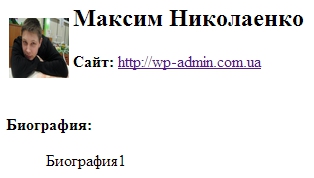 Świetny, teraz mamy wyświetlone dane i myślę, że powinniśmy przyjrzeć się bliżej, co dokładnie zrobiliśmy i jakie funkcje zostały użyte.
get_avatar( $aktualny użytkownik->ID, 60 ) – Wyświetla rozmiar awatara bieżącego użytkownika 60 na 60 piksele. Jeśli tak jak ja masz właśnie spłaszczony awatar, wtedy można to łatwo naprawić, po prostu nadpisując style dla danego obrazu następującego rodzaju w stylach motywów, po prostu dodaj .avatar img{ szerokość: automatyczny !ważny; }.
![]()
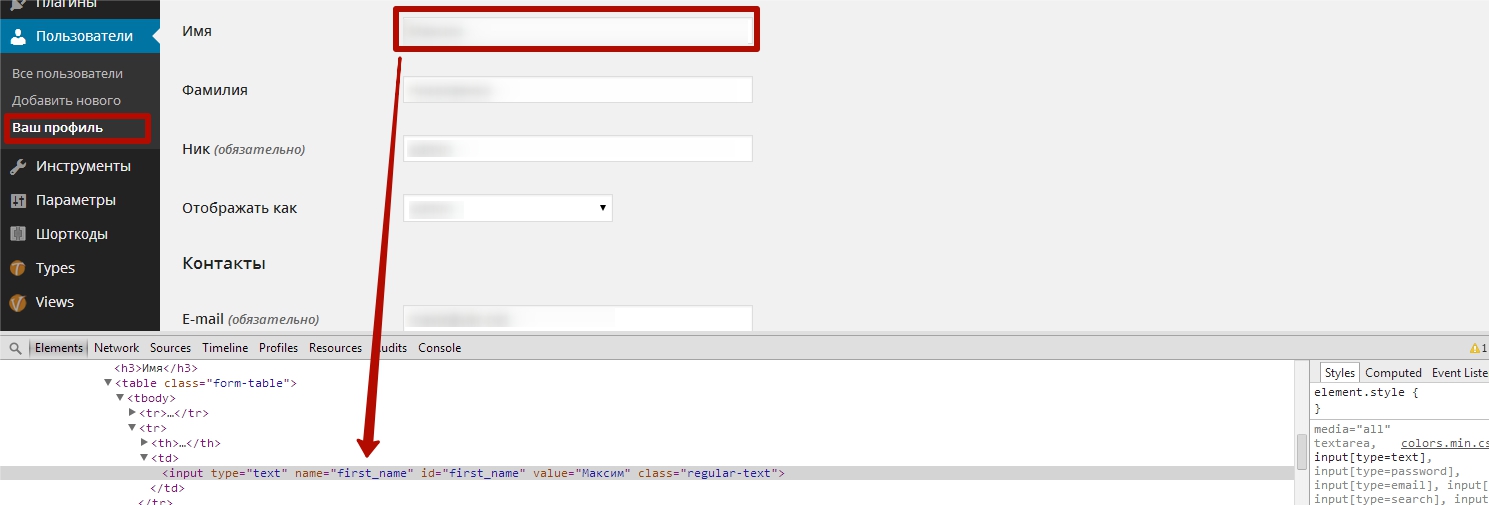
Skąd mam te zapasy i inne podobne:
$aktualny użytkownik->użytkownik_Imię
$aktualny użytkownik->użytkownik_nazwisko
Dla jasności wystarczy spojrzeć na taki obrazek, który zrobiłem przeglądając profil administratora w panelu administratora.

W ten sam sposób możesz wyświetlić dowolne pole na stronie profilu. Najczęściej jest inna sytuacja, kiedy trzeba dodać pola do profilu. I ten moment jest rozwiązany bardzo prosto, po prostu dodając kod do pliku functions.php, który znajduje się w folderze motywu.
|
1 2 3 4 5 6 7 8 9 10 11 12 13 14 15 |
function add_social_contactmethod( $contactmethods ) { // Add new ones $contactmethods['vk'] = 'vk.com'; $contactmethods['icq'] = 'icq'; $contactmethods['skype'] = 'skype'; $contactmethods['twitter'] = 'Twitter'; $contactmethods['facebook'] = 'Facebook'; // remove unwanted unset($contactmethods['aim']); unset($contactmethods['jabber']); unset($contactmethods['yim']); return $contactmethods; } add_filter('user_contactmethods','add_social_contactmethod',10,1); |
Edycja danych po stronie użytkownika
Trochę szukania w internecie, znalazłem interesującą strukturę kodu, za pomocą którego możesz edytować dane bieżącego użytkownika z poziomu frontendu. Utwórzmy nowy plik dla przyszłego szablonu i nazwijmy go page-edit-user-profile.php.
W pliku tworzymy znaną nam już strukturę, co pomoże CMSowi zobaczyć nasz szablon:
|
1 2 3 4 5 6 7 |
<?php /** * Template Name: Edit User Profile * * Allow users to update their profiles from Frontend. * */ |
Dodaj kod poniżej:
|
1 2 3 4 5 6 7 8 9 10 11 12 13 14 15 16 17 18 19 20 21 22 23 24 25 26 27 28 29 30 31 32 33 34 35 36 37 38 39 40 41 42 43 44 45 46 47 48 49 50 51 52 53 54 55 56 57 58 59 60 61 62 63 64 65 66 67 68 69 70 71 72 73 74 75 76 77 78 79 80 81 82 83 84 85 86 87 88 89 90 91 92 93 94 95 96 97 98 99 100 101 102 103 104 105 106 107 108 109 |
/* Get user info. */ global $current_user, $wp_roles; get_currentuserinfo(); /* Load the registration file. */ require_once( ABSPATH . WPINC . '/registration.php' ); $error = array(); /* If profile was saved, update profile. */ if ( 'POST' == $_SERVER['REQUEST_METHOD'] && !empty( $_POST['action'] ) && $_POST['action'] == 'update-user' ) { /* Update user password. */ if ( !empty($_POST['pass1'] ) && !empty( $_POST['pass2'] ) ) { if ( $_POST['pass1'] == $_POST['pass2'] ) wp_update_user( array( 'ID' => $current_user->ID, 'user_pass' => esc_attr( $_POST['pass1'] ) ) ); else $error[] = __('The passwords you entered do not match. Your password was not updated.', 'profile'); } /* Update user information. */ if ( !empty( $_POST['url'] ) ) update_user_meta( $current_user->ID, 'user_url', esc_url( $_POST['url'] ) ); if ( !empty( $_POST['email'] ) ){ if (!is_email(esc_attr( $_POST['email'] ))) $error[] = __('The Email you entered is not valid. please try again.', 'profile'); elseif(email_exists(esc_attr( $_POST['email'] )) != $current_user->id ) $error[] = __('This email is already used by another user. try a different one.', 'profile'); else{ wp_update_user( array ('ID' => $current_user->ID, 'user_email' => esc_attr( $_POST['email'] ))); } } if ( !empty( $_POST['first-name'] ) ) update_user_meta( $current_user->ID, 'first_name', esc_attr( $_POST['first-name'] ) ); if ( !empty( $_POST['last-name'] ) ) update_user_meta($current_user->ID, 'last_name', esc_attr( $_POST['last-name'] ) ); if ( !empty( $_POST['description'] ) ) update_user_meta( $current_user->ID, 'description', esc_attr( $_POST['description'] ) ); /* Redirect so the page will show updated info.*/ /*I am not Author of this Code- i dont know why but it worked for me after changing below line to if ( count($error) == 0 ){ */ if ( count($error) == 0 ) { //action hook for plugins and extra fields saving do_action('edit_user_profile_update', $current_user->ID); wp_redirect( get_permalink() ); exit; } } ?> <?php if ( have_posts() ) : while ( have_posts() ) : the_post(); ?> <div id="post-<?php the_ID(); ?>"> <div class="entry-content entry"> <?php the_content(); ?> <?php if ( !is_user_logged_in() ) : ?> <p class="warning"> <?php _e('You must be logged in to edit your profile.', 'profile'); ?> </p><!-- .warning --> <?php else : ?> <?php if ( count($error) > 0 ) echo '<p class="error">' . implode("<br />", $error) . '</p>'; ?> <form method="post" id="adduser" action="<?php the_permalink(); ?>"> <p class="form-username"> <label for="first-name"><?php _e('First Name', 'profile'); ?></label> <input class="text-input" name="first-name" type="text" id="first-name" value="<?php the_author_meta( 'first_name', $current_user->ID ); ?>" /> </p><!-- .form-username --> <p class="form-username"> <label for="last-name"><?php _e('Last Name', 'profile'); ?></label> <input class="text-input" name="last-name" type="text" id="last-name" value="<?php the_author_meta( 'last_name', $current_user->ID ); ?>" /> </p><!-- .form-username --> <p class="form-email"> <label for="email"><?php _e('E-mail *', 'profile'); ?></label> <input class="text-input" name="email" type="text" id="email" value="<?php the_author_meta( 'user_email', $current_user->ID ); ?>" /> </p><!-- .form-email --> <p class="form-url"> <label for="url"><?php _e('Website', 'profile'); ?></label> <input class="text-input" name="url" type="text" id="url" value="<?php the_author_meta( 'user_url', $current_user->ID ); ?>" /> </p><!-- .form-url --> <p class="form-password"> <label for="pass1"><?php _e('Password *', 'profile'); ?> </label> <input class="text-input" name="pass1" type="password" id="pass1" /> </p><!-- .form-password --> <p class="form-password"> <label for="pass2"><?php _e('Repeat Password *', 'profile'); ?></label> <input class="text-input" name="pass2" type="password" id="pass2" /> </p><!-- .form-password --> <p class="form-textarea"> <label for="description"><?php _e('Biographical Information', 'profile') ?></label> <textarea name="description" id="description" rows="3" cols="50"><?php the_author_meta( 'description', $current_user->ID ); ?></textarea> </p><!-- .form-textarea --> <?php //action hook for plugin and extra fields do_action('edit_user_profile',$current_user); ?> <p class="form-submit"> <?php echo $referer; ?> <input name="updateuser" type="submit" id="updateuser" class="submit button" value="<?php _e('Update', 'profile'); ?>" /> <?php wp_nonce_field( 'update-user' ) ?> <input name="action" type="hidden" id="action" value="update-user" /> </p><!-- .form-submit --> </form><!-- #adduser --> <?php endif; ?> </div><!-- .entry-content --> </div><!-- .hentry .post --> <?php endwhile; ?> <?php else: ?> <p class="no-data"> <?php _e('Sorry, no page matched your criteria.', 'profile'); ?> </p><!-- .no-data --> <?php endif; ?> |
Po wklejeniu kodu, jak wcześniej, utwórz nową stronę i przypisz do niej szablon Edytuj profil użytkownika. Zapisz utworzoną stronę i kliknij przycisk [Zobacz zmiany]:
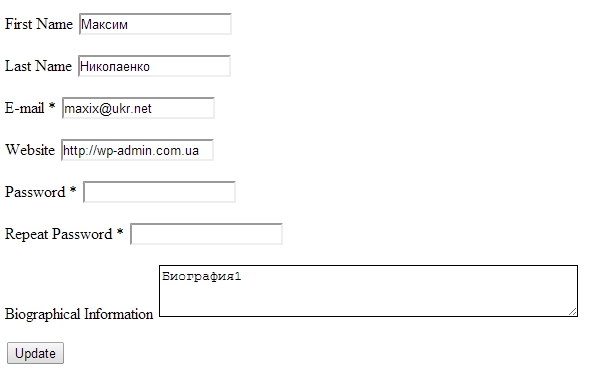
Jeśli wszystko zostanie wykonane poprawnie, zobaczysz tę formę edycji, powinna pracować. Wyświetlanie innych pól z poziomu panelu administracyjnego jest realizowane w podobny sposób. Przejdź do panelu i weź nazwę pola, który trzeba wyjąć.
Analogicznie do prezentowanego kodu wyświetlamy metadane autora:
<?php the_author_meta( 'Imię', $aktualny użytkownik->ID ); ?>
Zostało jedno zadanie, jest to możliwość edycji awatara dla autora, ale niestety WordPress blokuje próby edycji avatara od strony użytkownika, chętnie wysłucham Waszych sugestii i pomysłów jak pracować z avatarem, Chciałbym zrobić wszystko dobrze i pracować z interfejsem API WordPress.
Kontynuacja ulepszeń artykułu, czekaj, może nawet napisać wtyczkę do motywu, aby ułatwić pracę w nowych projektach.


- Podstawowy kurs projektowania stron internetowych;
- Układ stron;
- Ogólny kurs CMS WordPress oraz kontynuacja kursu dotyczącego tworzenia szablonów;
- Tworzenie stron internetowych w PHP.